How to Draw a Rose Flower Simple and Realistic for Kids
For kids and beginners, this article on how to draw a rose is very interesting and easy to follow. Drawing of a rose is super fun for kids with only a few strokes and steps. Roses are the most beautiful and fragrant flower among all the other flowers thus it attracts the most. let us learn simple rose drawing in this easy tutorial.
How to Draw a Rose Step by Step for Kids /Beginners
It’s also a fact that the red rose symbolizes love, the yellow friendship, the orange is for enthusiasm, the white rose defines purity and pink is for joy, etc.
Roses have other attractions also:
For decoration purposes and fragrance, roses are mostly used. Rose flowers are not only beautiful but also they are captivated for centuries, inspiring poets, artists, or can say every human being.
Here are some tips for drawing a rose:
Start by sketching the basic shape of the rose using light lines. This will help you get the proportions and placement of the rose correct.
Next, add the outline of the petals. Pay attention to the shape and curvature of the petals.
Begin to add details to the petals, such as the veins and texture.
Add shading to give the rose a more realistic appearance. Use a range of values, from light to dark, to create a sense of depth and dimension.
Don’t be afraid to make mistakes or try new techniques. Practice is an important part of improving your skills as an artist.
To create a more lifelike rose, pay attention to the way the petals overlap and how they curve and bend.
Consider the placement of the rose in your drawing. Is it a single rose or part of a bouquet? How does it fit in with the rest of the composition?
Remember to have fun and enjoy the process of creating art!
How to Draw a Rose Bud with Pencil:
follow these steps to draw your rose:
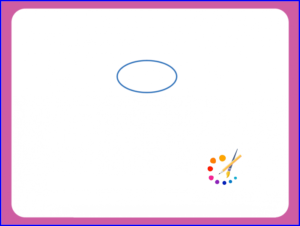
Step 1:
Draw an oval shape to start your rose drawing. However, nothing is perfect in nature you can draw it imperfect also. Your rose will look great as you are drawing it.
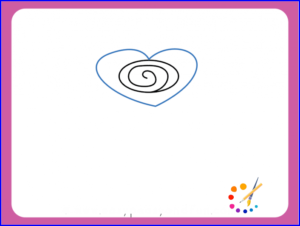
Step 2:
Inside the oval draw a small spiral in your chosen direction and number of turns. Your Determination will turn it beautifully not the direction and number of turns.
Step 3:
Around the spiral draw a heart shape in the manner that it touches from the top of the oval as shown in image below. If the other part of the heart touches the oval shape need not worry, again nothing is perfect in this world.
Step 4:
From the top of the heart shape start drawing a nice curvy S shape line and make a V shape point on below while reaching the bottom of the heart.
Step 5:
On the other end of the heart make a similar shape, draw a line so that it touches the previous shape without the pointy tip.
Step 6:
Draw a U shape below the image as shown in the image and you will see a rose blossoming.
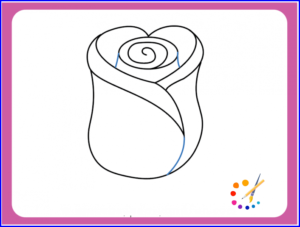
Step 7:
Add a few details according to the image given below to clarify the petals of your rose as shown in the image.
Step 8:
Under the flower draws a few sepals.
Step 9:
It’s time to draw stems and leaves for your rose
Step 10: Turn your rose red by filling colour to it however you can fill pink, yellow, or white with your choice. Filling colour is always fun. Your beautiful elegant simple rose drawing is complete and ready to blossom.
Thus this way we saw drawing a beautiful rose step by step. I hope you enjoyed this tutorial. Hence try for sure with your own observations and editing as we know practice makes us perfect.
Please refer to the following links for more easy drawings:
Skilled teacher, knowledgeable in and in adapting state content standards to individual needs in
Elementary-6th grade classrooms. Utilizes instructional materials, technology, and teaching methods to
engage students in effective learning opportunities in individual, small group, and whole-group settings to
maximize instructional time. Differentiates instruction for ELLs while exposing them to rigorous content,
with a focus on literacy skills in all subject areas. Establishes and maintains appropriate standards of
behavior in an inclusive and respectful environment for students from all socio-economic and cultural
backgrounds. Develops lesson plans using Backwards Planning Method to align content standards and
assessments with effective learning activities. Communicates and collaborates effectively with staff and
parents, and creates a safe and positive learning environment for students. Has taught in both in-person
and virtual environments. Professional Communicator with 20+ years of experience.